Hospitality-grade floor protection · Ships in 1–3 business days · 90-day limited warranty
Hospitality-grade floor protection · Ships in 1–3 business days · 90-day limited warranty
That cantilever chair drags back from the table and leaves a grey arc on the floor. Sled base furniture rides on a bent metal runner, so the fix depends on where the runner meets the floor. This guide matches the right glide to every spot on your frame, in minutes.
Specified by hotels, restaurants, and universities · Fits round, rectangular, and oval sled tubes
On this page:
Every sled base glide is one mounting method (screw-on or clip-on) and one floor call (a bare saddle or a fitted PA6 pad). Answer two questions and you know which one is yours.
1 Mounting method
If the frame is steel tube you can drill
Most sled frames. The polyamide saddle cradles the round tube and fastens through the wall with one or two screws. This covers mid-runner saddles, corner pieces, and end glides.
If the frame is thin wire with no room to drill
For thin wire frames and stacking chairs. The glide snaps over the wire by friction, no tools and no screws. Comes in anthracite, white, or cream.
2 Floor protection
If your floors are standard
The abrasion-resistant polyamide saddle handles all hard floors and carpet with no pad. This is most sled base furniture, straight out of the box.
If your floors are scratch-sensitive
For delicate smooth floors like oiled or waxed hardwood. Fit a PA6 needle-punched pad into the slot for a softer floor contact.
Got both answers? You are most of the way there. Next, check that your floor type suits a bare saddle or calls for a pad, then measure your tube for the right size.
The bare polyamide saddle works on every floor type, hard or soft. The only floor decision is the optional PA6 pad: fit it for scratch-sensitive smooth floors, and leave it out on carpet and rough surfaces. For broader hardwood care, the National Wood Flooring Association publishes maintenance standards for hardwood.
Aligned with NWFA guidance: the abrasion-resistant PA saddle slides on smooth and textured floors alike, no pad required.
Keep the pad for smooth floors: on carpet or a rough surface the PA6 pad gives up its grip and can snag, so run the bare saddle there and fit the pad only on scratch-sensitive smooth floors.
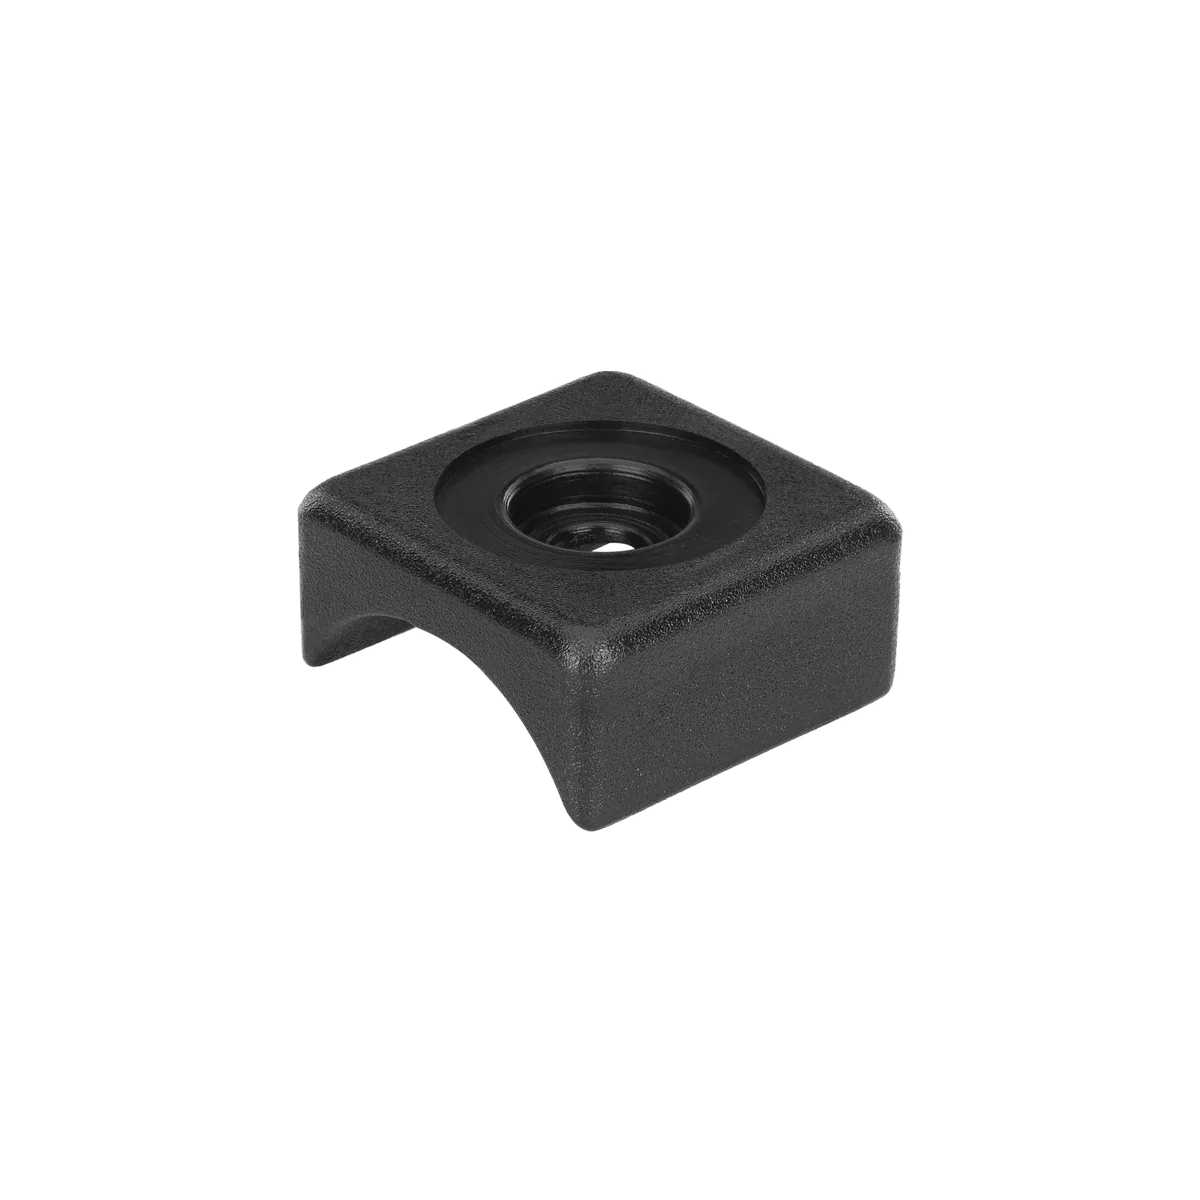
Mid-runner glides mount along the straight horizontal stretch of the runner, where the tube lies flat on the floor. The polyamide saddle cradles the tube from below and fastens through the wall with two screws. Five products cover round, square, and rectangular tubes from Ø 20 to 30 mm in solid-base and pad-slot forms.
Use a mid-runner glide when
✓ The glide sits on the straight horizontal section of the runner
✓ The tube lies flat on the floor at the contact point
✓ You want the default sled glide, a solid PA saddle for hard floors and carpet
✓ Your floors scratch easily, so you choose the pad-slot version and fit a PA6 pad
Mid-runner specifications
Saddle: Polyamide (PA), abrasion-resistant
Mount: Two screws through the tube wall
Tube sizes: Ø 20–30 mm (0.79″–1.18″)
Bases: Rectangular, square, or round; solid or PA6 pad slot
Floors: All hard floors and carpet (solid); smooth scratch-sensitive floors (pad fitted)
The default choice, a bare polyamide saddle that works on all hard floors and on carpet. The PA surface is abrasion-resistant and slides without snagging carpet pile.
The pad-slot version accepts an optional PA6 needle-punched pad. Fit it for scratch-sensitive smooth floors, or leave the slot empty for everything else.
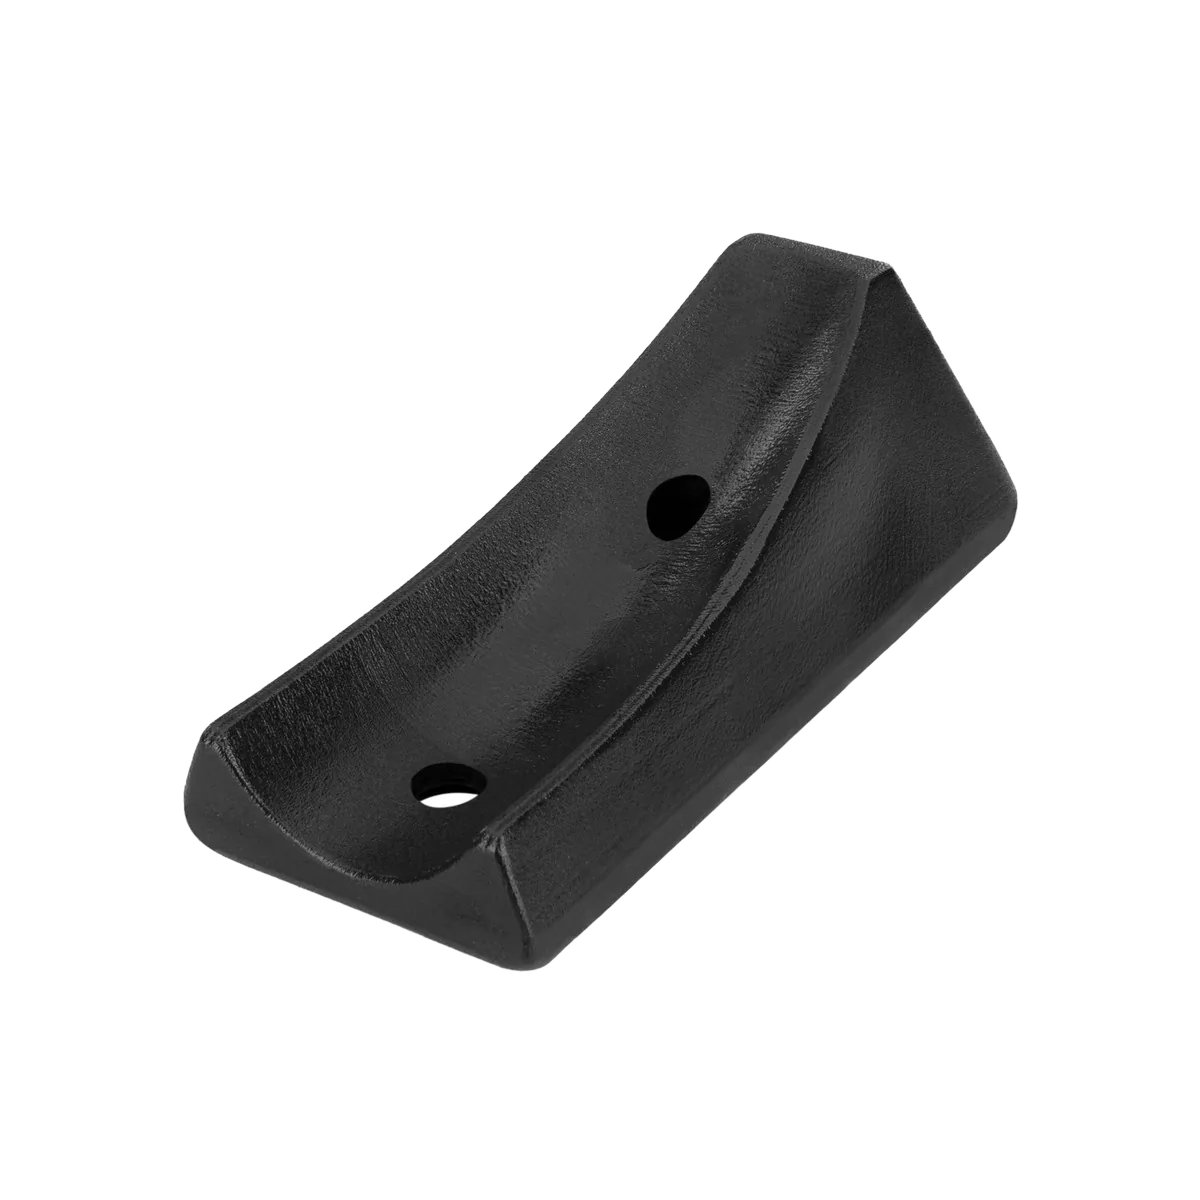
Corner glides sit on the curved bend where the runner turns from the floor up toward the seat. A longer two-hole base spans the curve so the glide cannot rock, and two screws hold it through the tube. Sizes run Ø 20 to 28 mm.
Use a corner glide when
✓ The glide sits on the curved corner of the runner
✓ The runner changes direction from horizontal to vertical at this point
✓ A mid-runner saddle would sit proud of the curve and rock
✓ You want two-screw security on the part of the frame that takes the most stress
Corner specifications
Saddle: Polyamide (PA), abrasion-resistant
Mount: Two screws through the tube wall
Tube sizes: Ø 20–28 mm (0.79″–1.10″)
Base: Extended two-hole base that spans the bend
Floors: All hard floors and carpet (solid); smooth scratch-sensitive floors (pad fitted)
Match the corner glide to your tube diameter. Each uses the extended two-hole base that spans the bend.
Two jobs share this section. End glides cap an open tube that points straight down at the floor. Clip-on glides snap onto thin wire frames where there is no room to drill. Pick by how the frame meets the floor.
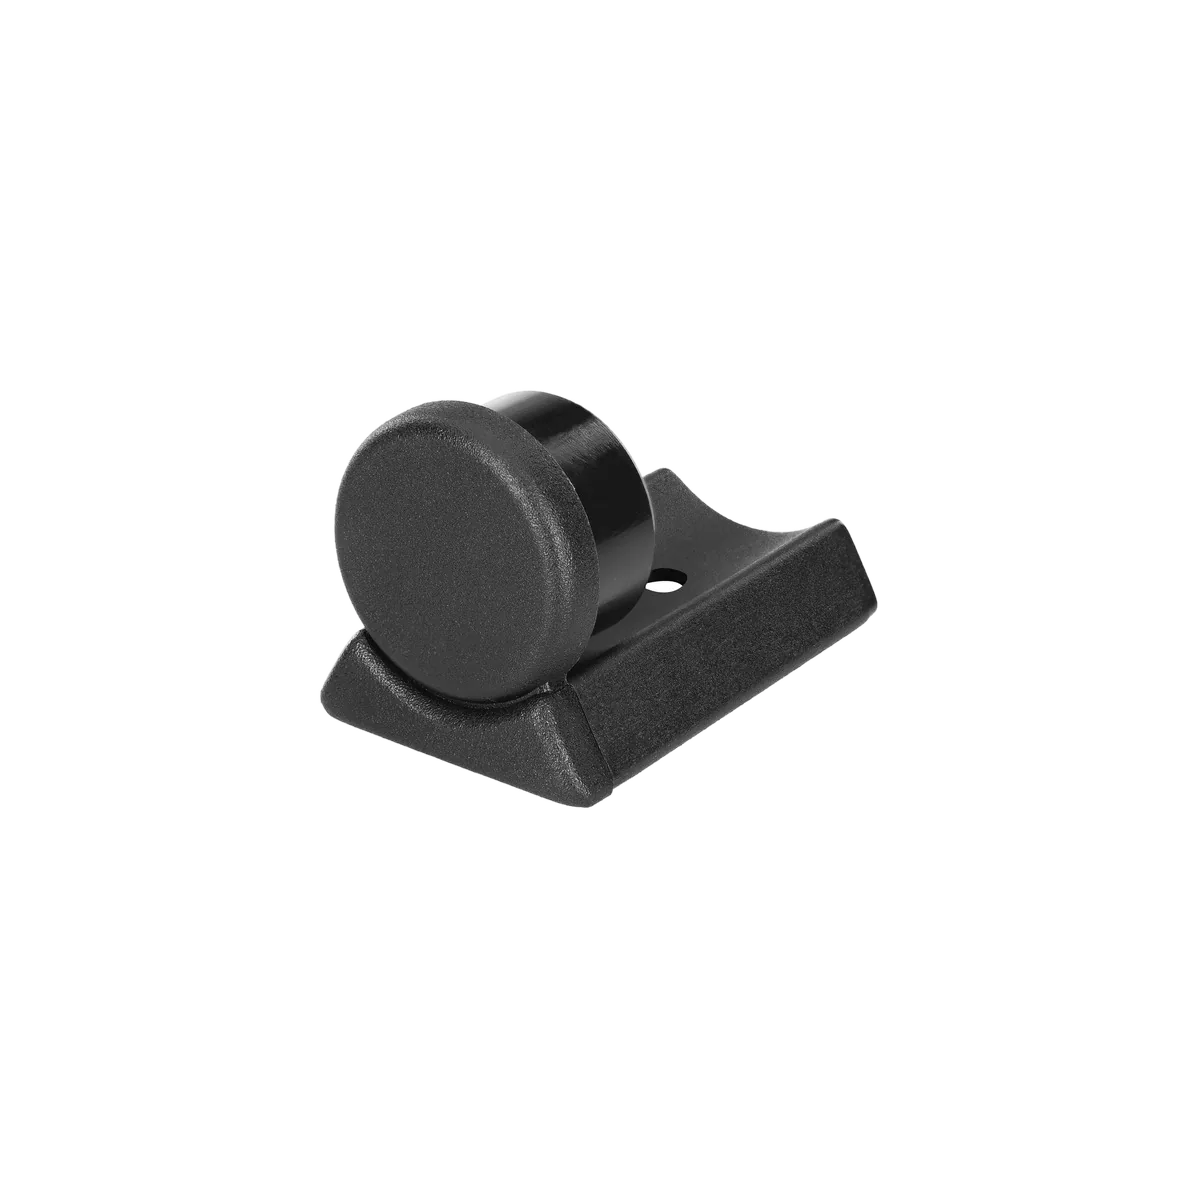
Use an end or clip-on glide when
✓ The tube end points straight down at the floor, so you need an end glide
✓ The frame is thin wire with no room for a screw, so you need a clip-on
✓ Your tube end is rectangular or oval, not just round
✓ You want a tool-free fit on a wire frame
End and clip-on specifications
End glide: Polyamide collar, one screw through the tube end
End shapes: Round, rectangular, and oval
Clip-on: Friction fit over Ø 10 mm wire, no tools
Clip-on colors: Anthracite, white, or cream
Floors: All hard floors and carpet
The collar wraps the cut end of the tube and one screw holds it. Match the shape to your tube end.
No screws. The glide snaps over the wire by friction, so it suits thin wire sled frames and stacking chairs.
Two things set every sled base glide: the shape of the tube where the runner meets the floor, and its outer dimension. Measure both and you can match the glide with confidence. Sizes are stated in millimeters with imperial conversions.
Tip the chair back or lay it on its side. Find the spots where the metal runner contacts the floor: the straight runs, the bends, and any open tube ends. Each spot may take a different glide.
Most frames use round tube. Some use rectangular or oval tube, and lightweight stacking frames use thin round wire. The shape sets the glide body you need.
With calipers or a ruler, measure across the outside of the tube. Round: the diameter. Rectangular or oval: the width across by the height. Wire frames: the wire diameter.
Note whether the glide sits on a straight run (mid-runner), a bend (corner), or an open tube end (end glide). Position sets the glide type, not just the size.
Finding your size: Sled base glides come in too many tube sizes to chart here. Measure your tube, then match the diameter, or the width by the height, to the glide listings.
A saddle that clamps firmly holds the chair steady and keeps the screws from working loose. A loose fit slides on the tube. When your measurement falls between two sizes, choose the one that grips snugly rather than the looser fit.
Measure the tube before ordering, then match the glide to your shape and size.
Both methods are quick. Screw-on saddles take a screw or two through the tube wall. Clip-ons push onto a wire frame with no tools. Most people fit a whole chair in a few minutes. Pick the method that matches your frame.
Tip the chair on its side or back. Wipe the tube, then set it into the saddle so the hole in the base lines up under the tube.
From the base side, drive the screw up through the hole and into the wall of the tube. Mid-runner and end glides take one screw; corner glides take two. On hard steel, a small pilot hole keeps it centered.
Drive until the countersunk head pulls flush into the base. Sitting flush keeps the screw clear of the floor once the chair is upright.
Set the chair down and slide it. The saddle should not rock or twist, and no metal should touch the floor.
On a wire frame, the glide goes where the wire meets the floor. Find the spot on each wire that carries the weight, usually the low point of the bend.
Hold the glide so its open slot faces up toward the wire. The slot fits Ø 10 mm wire.
Press until the wire snaps past the narrow opening and clicks into the rounded slot. No tools, no screws.
Tug the glide. The wire should stay seated in the slot. The chair’s weight presses it deeper, so it holds under load.
The usual fix for a sled base chair is a felt pad stuck to the tube. It holds for a few weeks. Then the adhesive lets go of the round metal, the pad slides off, and the runner is back on your floor. A molded glide is built to stay.
Hold: Held by a screw or clip rather than adhesive, so there is nothing to peel away from the tube. The fix is mechanical.
Shape: A polyamide saddle shaped to the round tube. Full contact along the curve, with no rocking on an edge.
Floor contact: A smooth, abrasion-resistant PA surface that slides on hard floors and carpet. An optional PA6 pad adds protection on delicate smooth floors.
Coverage: Matched to your tube size and to each spot on the frame: mid-runner, corner, end, and clip-on.
Hold: Adhesive on a round or curved tube, where there is almost no flat area to grip. It peels at the edges and works loose, then drops off.
Shape: A flat felt disc that never matches a round tube. It sits on one edge and rocks under weight.
Floor contact: Felt packs flat over time, then grit embeds in the fibers and grinds the floor it was meant to protect.
Coverage: One generic disc. Never shaped to the bend, the end, or a thin wire frame.
A sled base glide is a simple, honest part: a shaped polyamide body, an optional fitted pad, and a screw or two on the models that fasten down. Here is what each part does.
The molded body, shaped to cradle the round tube and slide on the floor. Polyamide (PA) is abrasion-resistant, built to take the daily push and pull of a chair sliding in and out. Every sled base glide shares it. On a clip-on, it is the entire glide; on screw-on models, the screw and any pad attach to it.
An optional pad that fits the slot on pad-slot models. The PA6 needle-punched fiber gives a softer contact for delicate smooth floors like oiled or waxed hardwood. Leave it out for everyday hard floors and carpet.
On screw-on saddles, a steel screw fastens the glide to the tube from underneath. Mid-runner and end glides take one; corner glides take two. Clip-on glides use no screw at all; they hold by friction on the wire.
These are the questions that come up most when people fit glides to a sled base or cantilever chair.
Look at where the metal runner touches the floor. A straight horizontal run takes a mid-runner saddle, the curved bend takes a corner glide, and an open tube end takes an end glide. Thin wire frames use a clip-on. Most chairs need a mix. Then measure the tube so the glide matches its size and shape.
Yes. The bare polyamide saddle slides on carpet, carpet tile, and area rugs as well as on every hard floor. The only exception is the optional PA6 pad: once you fit it for delicate smooth floors, keep it off carpet and rough surfaces, where it can snag. For carpet, run the bare saddle.
Screw-on saddles fasten to the tube with a screw or two, so there is no adhesive to peel. Clip-on glides grip a thin wire by friction, and the chair’s weight seats them deeper. Neither relies on glue, which is what lets stick-on felt work loose on a round tube.
Measure across the outside of the tube where the runner meets the floor. For round tube, take the diameter. For rectangular or oval tube, take the width by the height. For a wire frame, measure the wire diameter. Match that measurement to the glide listing. When you fall between two sizes, choose the snugger fit.
Usually not. A single sled chair often meets the floor in more than one way: straight runs, bends, and open ends. Walk the frame and count each contact point, then match a glide to each. Buying the right mix once is quicker than finding later that a corner or end was missed.
Browse the full glide lineup by type. Nail-on glides hammer into wooden legs; self-adhesive glides peel and stick to any flat base. Anti-slip versions swap the smooth surface for a rubber grip. Every size lives on its product page.
Screw onto a straight run of round tube. Pick a rectangular, round, or square base, with or without a pad slot for delicate smooth floors.
A curved body for the bend of the runner. Two screws hold it flat on the curve, with a single-screw option and a pad-slot version.
Cap an open tube end. Sized for round, rectangular, and oval tube openings.
Clip-on glides snap onto a thin wire frame with no tools. Flat-bottom nail-on glides fix to a flat sled runner.
Whether it is one cantilever chair or a whole waiting room of them, the right sled base glide is in the catalog.
Browse other furniture guides: Glides Guide · Slides Guide · Pads Guide · Tube Plugs Guide · Leveling Feet Guide
Product categories: Furniture Glides · Furniture Slides · Furniture Pads · Tube Plugs & End Caps · Leveling Feet · Sled Base Glides
Business accounts: Business Solutions for volume pricing, B2B accounts, and commercial orders.