You’ve got furniture on a hard floor and something needs to go between the two. The question is what, and the answer depends on three things: what your legs are made of, what shape they are, and whether the furniture moves or stays put.
This guide walks through all of it. How to measure. How to choose between nail-on and self-adhesive. When you need standard PA6 glides versus anti-slip. And how to install them so they actually stay on.
The glide has to match the leg. An oversized glide overhangs the edge, the adhesive loses contact, and the glide peels off within days. An undersized glide leaves the leg perimeter exposed — bare wood or metal grinding directly into your floor. This is the step most people skip, and it’s the reason most people end up replacing glides they just bought.
It takes 30 seconds. Here’s how.
Circular cross-section. Measure the diameter straight across the widest point at the base of the leg — not the top, not the middle, the very bottom where the glide will sit.
Equal sides. Measure one side at the base. If both sides aren't equal, you have a rectangular leg — measure both dimensions.
Unequal sides. Measure the width (short side) and the length (long side), both at the base. Common on mid-century and Scandinavian furniture.
Flip the furniture or lay it on its side. You need clear access to the bottom of the leg — the flat face where the glide sits. Not an inch up. Not where the leg meets the apron. The very bottom.
Use a ruler, tape measure, or calipers. For round legs, measure the diameter. For square and rectangular legs, measure each side. Millimeter precision is all you need.
If the leg tapers, the bottom is smaller than the top. Measure at the bottom. A lot of modern and mid-century furniture tapers significantly — the dimension halfway up the leg is irrelevant for glide sizing.
If your measurement falls between two sizes, choose the smaller glide. A glide that sits fully inside the leg footprint stays bonded and stays protected. A glide that overhangs catches on things, lifts at the edges, and peels off. Keep at least 80% of the leg base covered.
Two mounting methods. Nail-on for solid wood legs. Self-adhesive for everything else — metal, plastic, hollow tube, and wood when you don’t want a rivet hole. Both take less time than reading this section.
The permanent solution for solid wood legs.
Position the glide centered on the bottom of the leg. The anti-rotation mortise on the tubular rivet keys into the wood. Align the square and rectangular glides with the leg edges before driving the rivet.
Drive the tubular rivet into the wood with a rubber mallet. No pre-drilling. The rivet separates wood fibers rather than removing material — the hole stays tight over multiple replacements. Tap until the glide sits flush against the leg.
Check for wobble and spin. The anti-rotation mortise prevents the glide from rotating on the rivet — if it spins, the mortise hasn’t seated fully. Tap it again until it locks.
Set the furniture down and test. Push the chair or slide the table across the floor. Smooth, quiet, no catching. Done.
For metal, plastic, hollow tube, and wood legs when riveting isn’t an option.
Clean the bottom of the leg with isopropyl alcohol (70% or higher). This is the step that determines whether the glide stays on for years or falls off in a week. Old wax, dust, oils, and residue from previous adhesive all kill the bond. Clean surface = permanent bond.
Peel the protective backing from the adhesive side. Discard it immediately — if the exposed adhesive touches anything before the leg, it picks up contamination that weakens the bond.
Center the glide on the leg base and press firmly for 30 seconds. Full contact across the entire surface. No air pockets, no lifted edges, no gaps at the corners. For square and rectangular glides, align the edges with the leg edges — any overhang will catch and peel.
Set the furniture down. The weight of the furniture helps the cure. Wait 48 hours before heavy use — dragging chairs or sliding tables before the adhesive fully bonds is the number one reason self-adhesive glides fail early.
Two decisions. First: how does the glide attach to the leg? Second: what does the glide’s surface do when it touches your floor? The answers depend on what your furniture is made of and how it’s used.
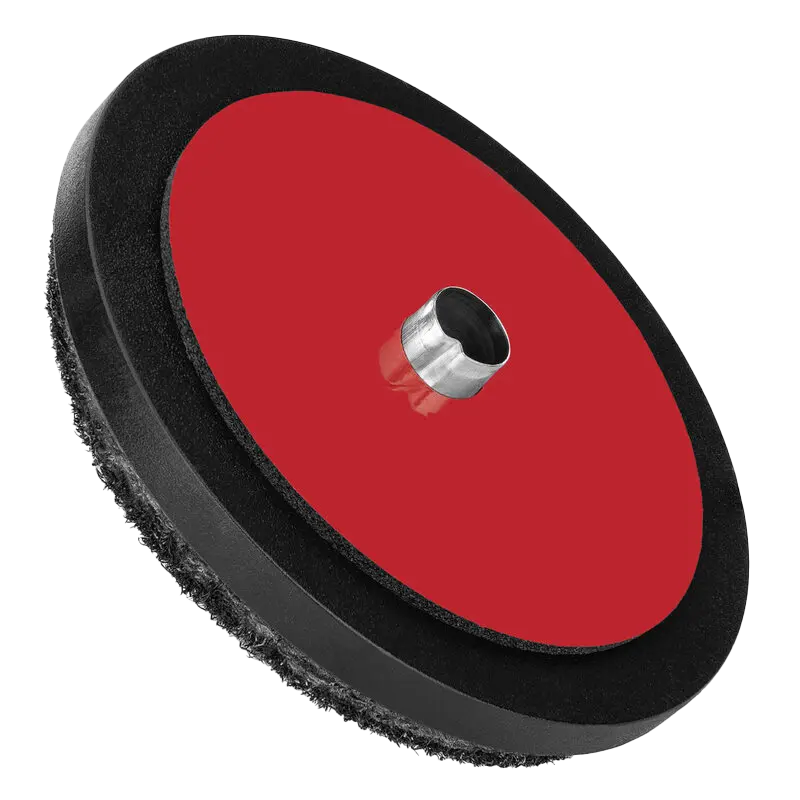
The mechanical option. A zinc-plated steel tubular rivet drives into the wood with a rubber mallet — no drilling, no prep. The anti-rotation mortise locks the glide in position so it can’t spin on the rivet. This is the permanent solution. The rivet won’t loosen over years of daily use, and when the glide eventually wears out, you replace it in the same hole without damaging the leg.
Use nail-on when:
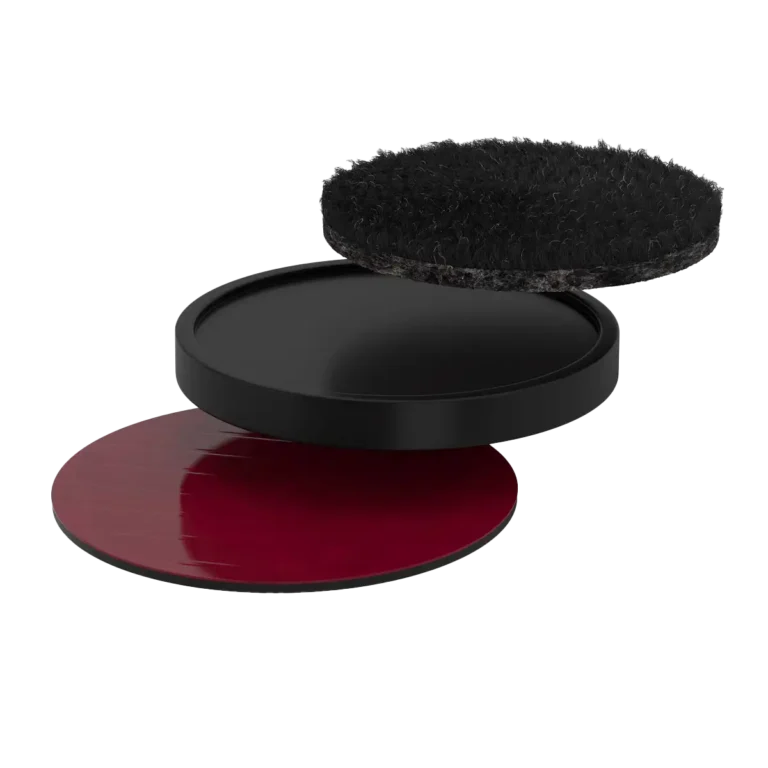
Available in round (5 sizes), square (5 sizes), and rectangular (1 size). PA6 hard floor and NR+CR anti-slip surface options.
The universal option. EHBF acrylic foam tape bonds to any clean, smooth surface — chrome, powder-coated steel, anodized aluminum, engineering plastics, and wood. Peel, press, done. No tools, no holes, no risk of splitting.
Use self-adhesive when:
Available in round (5 sizes), square (5 sizes), and rectangular (1 size). PA6 hard floor and NR+CR anti-slip surface options.
The short version: If the legs are solid wood and the furniture is yours, nail-on. If the legs are metal or plastic, or you don’t want holes, self-adhesive. Both use the same ABS platform and the same surface materials — only the attachment method differs.
This furniture glides guide covers both standard and anti-slip options, so you can choose based on how your furniture is used.
The default choice. PA6 needle-punched fiber (1,450 g/m² pile density) glides silently across hardwood, tile, laminate, vinyl, stone, and all other hard floors. The fibers are oriented vertically and mechanically interlocked — they resist lateral shear forces and won’t delaminate the way felt does. This is what you want on any furniture that needs to move smoothly: dining chairs, desk chairs, kitchen tables, anything you push, pull, or reposition.
The opposite job. NR+CR (Natural Rubber + Chloroprene Rubber) at 30 Shore A provides controlled grip — the furniture stays exactly where you put it. Same ABS platform, same mounting methods, different surface for a different problem.
Use anti-slip when the furniture must not slide:
Anti-slip glides are for hard floors only. On carpet, use furniture slides with an ABS surface — carpet needs the opposite solution.
The short version: If the legs are solid wood and the furniture is yours, nail-on. If the legs are metal or plastic, or you don’t want holes, self-adhesive. Both use the same ABS platform and the same surface materials — only the attachment method differs.
PA6 and NR+CR surfaces are chemically inert — they won’t react to floor sealers, waxes, or cleaning products. If your floor has a finish, these glides won’t damage it. The National Wood Flooring Association (NWFA) recommends protective glides on all furniture legs as a primary measure for maintaining hardwood floor condition.
all species, oiled, waxed, lacquered
✓ Protected
parquet, bamboo, herringbone
✓ Protected
all types and AC ratings
✓ Protected
LVP, LVT, sheet vinyl, Marmoleum
✓ Protected
glazed, unglazed, polished
✓ Protected
marble, granite, slate, travertine
✓ Protected
sealed, polished, epoxy-coated
✓ Protected
Marmoleum, sheet linoleum
✓ Protected
Different furniture puts different demands on a glide. A dining chair that moves 30 times a day needs a different solution than a cabinet that hasn’t moved since you placed it. Here’s what works for each.
The hardest-working glides in the house. Pushed back, pulled in, 20–30 times a day under full body weight. Nail-on for wood legs, self-adhesive for metal. PA6 surface. Most common size: Ø 28 mm or 28 × 28 mm.
Heavy, moves occasionally, but every move counts — the full weight drags across the floor in one long stroke. Nail-on for solid wood legs, self-adhesive for metal or pedestal bases. Most common size: Ø 50 mm or 50 × 50 mm.
Tilted back constantly, kicked into position, legs under asymmetric load every time someone sits down. Same punishment as dining chairs, same recommendation. Nail-on for wood, self-adhesive for metal. Most common size: Ø 23 mm or Ø 28 mm.
Lighter use, but gets bumped and nudged across the floor more than people think. Nail-on for solid wood legs, self-adhesive for metal or turned legs you don’t want to rivet. Most common size: Ø 38 mm or Ø 50 mm.
The highest-use furniture in most homes. Moved 20–30 times a day, often under full body weight. Nail-on glides for wood legs, self-adhesive for metal. PA6 surface. Most common size: Ø 28 mm or 28 × 28 mm
The highest-use furniture in most homes. Moved 20–30 times a day, often under full body weight. Nail-on glides for wood legs, self-adhesive for metal. PA6 surface. Most common size: Ø 28 mm or 28 × 28 mm
The highest-use furniture in most homes. Moved 20–30 times a day, often under full body weight. Nail-on glides for wood legs, self-adhesive for metal. PA6 surface. Most common size: Ø 28 mm or 28 × 28 mm
The highest-use furniture in most homes. Moved 20–30 times a day, often under full body weight. Nail-on glides for wood legs, self-adhesive for metal. PA6 surface. Most common size: Ø 28 mm or 28 × 28 mm
Every product in this furniture glides guide is engineered as a complete system — each material plays a specific role in durability, noise reduction, and floor protection.
Built with impact-resistant materials that deliver smooth movement, quiet operation, and dependable floor protection for hardwood, tile, laminate, and vinyl surfaces.
Needle-punched nylon fiber provides smooth, quiet gliding on hardwood, tile, laminate, and vinyl. Resists lateral stress without delaminating.
High-impact engineering plastic platform. Dimensional stability from -20°C to 80°C. Won't crack or age like cheap plastic.
Extra High Bond acrylic foam backing on larger sizes for enhanced stability
Tubular rivet separates wood fibers instead of removing them. Zinc-iron plating resists corrosion in humid environments.
Built with pressure-sensitive materials that deliver smooth movement, quiet operation, and dependable floor protection across hardwood, tile, laminate, and vinyl surfaces.
Needle-punched nylon fiber provides smooth, quiet gliding on all hard floors. Resists lateral stress without delaminating.
High-impact engineering plastic platform. Dimensional stability from -20°C to 80°C. Won't crack or age like cheap plastic.
Extra High Bond acrylic foam bonds permanently to metal, plastic, and wood. 48-hour cure time for maximum strength.
Refer back to this furniture glides guide any time you replace worn glides or purchase new furniture.
Furniture glides are protective pads that attach to the bottom of furniture legs. They prevent scratches, scuffs, and noise while allowing smooth movement on hardwood, tile, laminate, and vinyl floors.
Yes. Properly sized glides with PA6 or rubber surfaces prevent scratches, scuffs, and wear on hardwood, tile, laminate, vinyl, and stone floors.
Chairs, tables, bar stools, sofas, and beds on hard flooring all benefit from glides — anything that moves or could shift over time.
Yes. PA6 glides considerably reduce scraping and squeaking noises on tile, hardwood, laminate, and other hard surfaces.
Choose a glide that closely matches the shape and size of your furniture leg. Measure the leg at the base where the glide will sit. For detailed measuring instructions, see the “How to Measure” section above.
Nail-on glides are for wooden legs. Self-adhesive glides work on metal, plastic, or wood when you can’t hammer in a rivet.
Yes. Worn glides should be replaced immediately to prevent exposed abrasive materials from coming in contact with the floor.
High-quality glides offer years of long-lasting protection. Lifespan depends on usage — dining chairs moved daily will wear faster than bedroom furniture.
No. Furniture glides are designed for hard floors only (hardwood, tile, laminate, vinyl, stone). For carpet, use furniture slides.